Thursday, January 29, 2009

This is no longer uniquely a food blog


and these words are sweetness and melancholy.

"Words, Wide Night"

Somewhere on the other side of this wide night
and the distance between us. I am thinking of you.
The room is turning slowly away from the moon.

This is pleasurable. Or shall I cross that out and say

it is sad? In one of the tenses I singing
an impossible song of desire that you cannot hear.

La lala la. See? I close my eyes and imagine

the dark hills I would have to cross
to reach you. For I am in love with you

and this is what it is like or what it is like in words.

--Carol Ann Duffy

Tuesday, January 20, 2009

Napa Cabbage Salad with Buttermilk Dressing

This salad is good. Really good.
And that's coming from someone who doesn't really like raw vegetables.
Especially none of the ones included in this salad.
But I've been wooed and won.

Try. This. Salad.

(As seen in Gourmet, Nov 2007)

1/2 cup well-shaken buttermilk
2 tablespoons mayonnaise
2 tablespoons cider vinegar
2 tablespoons minced shallot
1 tablespoon sugar
3 tablespoons finely chopped chives
1 pound Napa cabbage, cored and thinly sliced crosswise (4 cups)
6 radishes, diced
2 celery ribs, thinly sliced diagonally

Whisk together buttermilk, mayonnaise, vinegar, shallot, sugar, 1/2 teaspoon salt, and 1/4 teaspoon pepper in a large bowl until sugar has dissolved, then whisk in chives.

Toss cabbage, radishes, and celery with dressing.

Monday, January 19, 2009

Sunday, January 11, 2009

Nutmeg-Maple Cream Pie

Okay, this was supposed to be a recipe for pie. This being my first attempt at par-baking (and why is it called par-baking? Shouldn't it be called pre-baking?) and at using a tart pan, I didn't understand all the warnings and comments about the crust "collapsing". Well... let's just say I learned my lesson, my pie came out rather more like a deflated custard cookie, and the pictures weren't pretty. So let's just focus on the pie crust instead, and look at pictures of butter instead, shall we?


Very nice.

The pie was still delicious, and the pie crust flaky and buttery. I can probably only say that because I don't have any standards of comparison. That's okay. Mostly I had fun using a tart pan.

Lessons learned:
1. Don't just stick little bits of dough haphazardly around the edge of the pan in a desperate effort to patch it up. Those spots you don't
think are going to show? They do.
2. I figured out that the beans or the pie weights are to keep the sides from falling down more than they are to keep things from rising up. So fill 'er up all the way.
3. Par-baking for n00bs might not be worth it.

Onward!


Recipe for really great Pie Crust: (I promise, mine just wasn't pretty.)

Ingredients:
1/2 cup ice water, add ice cubes to keep cold
2.5 cups flour
1 tbsp sugar
1 tsp salt
1 cup unsalted butter (2 sticks), cut into 1/2 inch cubes (keep cold)

In a large bowl, whisk together the flour, sugar, and salt.

Sprinkle the butter cubes over the flour and begin working them in with a pastry blender, using it to scoop and redistribute the mixture as needed so all parts are worked evenly. (Alternately, you could use a food processor for this part). Stop when the mix resembles a coarse cornmeal; this won’t take long. Don't worry about the butter pieces being different sizes or still rather chunky: apparently, these little pockets of butter will somehow allow the pie to become flakier while baking... I don't understand the exact science, but it tastes real good.

Drizzle 1/2 cup of the ice-cold water (but not the cubes) over the butter and flour mixture. Using a rubber spatula, gather the dough together. Add more ice water a tablespoon at a time until the dough comes together fully. Once it's come together in large clumps, remove the spatula and use your hands. Gather and pat all the clumps together into one giant mound.

Divide the dough in half and pack each half in a few layers of plastic wrap. (For an open top pie, only half the dough is needed). Chill the dough in the refrigerator for at least an hour before use. The remainder of the dough can be kept in the fridge for up to a week, or in the freezer for longer. (I also read that freezing the dough for at least half an hour before use keeps the crust from that terrible little collapsing problem.)

More details, photos, and expertise to be found here and here, if you want to see what it's all supposed to look like, instead of what it accidentally did.

Now let's talk about the maple goodness that redeemed my poor pie's looks. It was like discovering a good personality. Warm, sweet, noticeable without being overbearing. And melt in your mouth. Appearances can be forgotten if you're eating with your eyes closed, and you might have to with this one.

Nutmeg-Maple Cream Pie
(New York Times)

3/4 cup maple syrup
2 1/4 cups heavy cream
4 egg yolks
1 whole egg
1/4 teaspoon salt
1 teaspoon freshly grated nutmeg
1 teaspoon vanilla extract
1 9-inch pie crust (half the dough)

Par-bake pie crust: Preheat oven to 350 degrees. Line pie refrigerated pie shell with foil or parchment paper and fill with pie weights or dried beans (FILL). Bake 10 to 12 minutes or until beginning to set. Remove foil with weights and bake 15 to 18 minutes longer or until golden. If shell puffs during baking, press it down with back of spoon. Cool on wire rack. Lower temperature to 300 degrees.

Prepare filling: In a medium saucepan over medium-high heat, reduce maple syrup by a quarter, 5 to 7 minutes. Stir in cream and bring to a simmer. Remove from heat.

In a medium bowl, whisk together egg yolks and egg. Whisking constantly, slowly add cream mixture to eggs. Strain mixture through a fine-mesh sieve into a cup or bowl with pouring spout. Stir in salt, nutmeg and vanilla.

Pour filling into crust and transfer to a rimmed baking sheet. Bake until pie is firm to touch but jiggles slightly when moved, about 1 hour. Let cool to room temperature before serving.

Yield: One 9-inch pie, 8 servings

Saturday, January 10, 2009

Veselka’s Cabbage Soup

This soup is so good, SO good, especially if you love sauerkraut as much as I do.
Next on my list: borscht.

Yield: serves 6 to 8
(as seen in New York Magazine)

Ingredients:
1 pound pork butt, cut into small cubes
1 1/2 quarts chicken stock
4 cups water
3 allspice berries
3 bay leaves
1 tablespoon dried marjoram
1 cup sauerkraut, plus around 4 tablespoons juice
1 large potato, peeled and diced
2 carrots, minced
3 stalks celery, minced
1 small onion, diced
2 cups fresh cabbage, shredded thin

Place the pork in a medium stockpot with the chicken stock, water, allspice, bay leaves, and marjoram. Bring to a boil and then simmer on low heat for about 2 hours. Remove the pork and set aside on a plate to cool. Skim fat from stock, leaving a few “eyes” of fat for flavor.

Add sauerkraut and simmer for 20 minutes. Add potato and simmer for 5 minutes. Add the carrots, celery, onion, and cabbage and simmer for 20 minutes. Add the pork and simmer for 10 more minutes. Season with salt and pepper. Add sauerkraut juice.

Almond Poppy Seed Bread


(as found at The Kitchen Sink)

Ingredients:
3/4 cup sugar
1/4 cup unsalted butter, softened

3 egg whites, lightly beaten
1/2 cup + 2 tablespoons buttermilk
3/4 cup sour cream
1 tablespoon almond extract
2 cups all-purpose or white whole wheat flour
1 teaspoon baking powder
1/4 teaspoon baking soda

1/4 teaspoon salt
1 tablespoon poppy seeds


Preheat the oven to 350. Grease a large loaf pan.

In the bowl of a stand mixer, beat the butter and sugar together until light and fluffy. Add the egg whites, buttermilk, sour cream and almond extract to the butter-sugar mixture and beat until combined.

In a separate medium-sized bowl, whisk together the flour, baking powder, baking soda and salt. With the mixer running on low speed, slowly add the whisked dry ingredients. When the mixture is almost combined, add the poppy seeds. Beat until the wet and dry ingredients have just combined and the poppy seeds are distributed throughout the batter.

Pour the batter into the prepared loaf pan and use a rubber spatula or spoon to smooth the top. Bake for 60 to 65 minutes, or until the top of the loaf is golden brown and a tester inserted in the center of the loaf comes out clean.

Thursday, January 8, 2009

Black-Bottom Cupcakes


(From The Great Book of Chocolate by David Lebovitz)

Yield: 36 mini cupcakes or 12 full-size cupcakes. I endorse only mini-cupcakes. (Solely for the cuteness factor. Well, and the fact that it feels like you have so many more.)

Cheesecake filling:
8 ounces cream cheese, at room temperature
1/3 cup granulated sugar
1 large egg, at room temperature
2 ounces bittersweet chocolate, coarsely chopped (or mini chips)

Chocolate cupcakes:
1 1/2 cups all-purpose flour
1 cup firmly packed light brown sugar
5 tablespoons natural unsweetened cocoa powder (not Dutch-processed!)
1 teaspoon baking soda
1/4 teaspoon salt
1 cup water
1/3 cup unflavored vegetable oil
1 tablespoon white or cider vinegar
1 teaspoon vanilla extract

Preheat to 350°F. Grease a muffin tin or line the tin with paper muffin cups.

For the filling:

Beat together the cream cheese, granulated sugar, and egg until smooth. Stir in the chopped chocolate pieces. Set aside.

For the cupcakes:

In a medium bowl sift together the flour, brown sugar, cocoa powder, baking soda, and salt.

In a separate bowl, mix together the water, oil, vinegar, and vanilla.

Make a well in the center of the dry ingredients and stir in the wet ingredients, stirring until just smooth. (Do not stir for too long or you will over mix the batter and end up with not-so-tender cupcakes.)

All together now:

Divide the batter among the muffin cups. Spoon a teaspoon of the filling into the center of each cupcake, dividing the filling evenly. Fill the cups about 80-90% full.

Bake for approximately 25 minutes, or until the tops are slightly golden brown and a toothpick comes out clean. (Keep a close eye on the cupcakes for the last few minutes. This is key, as the lovely white of the cheesecake can become a slightly-less-lovely golden brown within a minute. Mine were perfect at 28 minutes.)

Tuesday, January 6, 2009

Baby's First Panini

I suspect this sudden surge in posts will last about as long as the rest of my New Year's Resolutions do, in which case, we must be nearing the end. It's been about a week. But maybe not - maybe I've changed...


No. I don't think so, not for some things anyway. Consistency's just not my strong suit. But I can live with that. Consistently.

In the meanwhile, I'm still intoxicated by the heady elixir of food aesthetics (new discovery of food blogs + new chef-y gadgets to play with + experimentation with my darling D60 >> all food, all the time), so I'm going to make the most of it.

Here is the documentation of my first panini. I love panini(s?). Love. and lo and behold, my sister bought me a panini maker for Christmas with only the slightest bit of hinting. ("You there, I want a panini maker for Christmas. Write it down.") It was warm and delicious and everything that its humdrum cousin the Sandwich wishes it could be.


Ingredients:
Italian herb flatbread
Roasted bell peppers, zucchini, and onions (sliced, drizzled with olive oil, 325 degrees)
Slices of buffalo mozzerella
Baby greens
Sun-dried tomatoes
Peppered salami and pepperoni
Garlic pesto (store-bought, but I'm working my way towards making my own pesto. And by "working my way", I mean that I plan to buy a basil plant soon-ish.)

Directions:
...Assemble.

Cranberry Crumble Bars

This was originally a recipe for blueberry bars, and while I would much prefer them that way, luck would have it that I decided to begin self-imposed culinary school in the winter rather than the summer. I guess my distaste for summer school trumps my distaste for cranberries. Well, distaste is too strong a word - more like indifference. I was hugely disappointed in my fresh Cranberry-Pear Relish for Thanksgiving dinner (It's such an unpleasantly sour berry. My teeth hurt just thinking about it), so I decided to give them another go. I refuse to be beaten by this pygmy of an opponent.

The crumble bars turned out far better than the relish (read: I was actually able to eat them). Still a bit tart for me, but I prefer sweet fruits and berries, which of course, means that using cranberries not once but twice was a painfully stupid idea. My family appeared to really enjoy them though, but I think that's just because they like to eat. For those who are not fond of pucker, I would probably up the amount of brown sugar, maybe add some maple syrup. The ice cream also helps enormously. I ate a lot of it that way. A lot.


(adapted from Smitten Kitchen's recipe for Blueberry Crumb Bars)

Ingredients:

Crust and crumble:
1 cup white sugar
1 teaspoon baking powder
3 cups all-purpose flour
zest of 1 small navel orange
1 cup cold butter (2 sticks)
1 egg
1/4 teaspoon salt

Filling:
juice of one small navel orange
3 cups fresh cranberries, chopped
1/2 cup white sugar
1/2 cup light brown sugar
4 teaspoons cornstarch

Preheat the oven to 375 degrees. Lightly grease a 9×13 inch pan.

Using a medium bowl, sift together the dry ingredients for the crust, and add in orange zest. Use a fork or pastry cutter to blend in the butter and egg. Dough will be crumbly. Pat half of dough into the prepared pan.

In another bowl, stir together the 1/2 cups of white and brown sugar, cornstarch and orange juice. Gently mix in the cranberries. Sprinkle the cranberry mixture evenly over the crust. Crumble remaining dough over the berry layer.

4. Bake in preheated oven for 45 minutes, or until top is slightly brown. Makes 24 small squares. Serve hot with vanilla bean ice cream, or at room temperature.

Monday, January 5, 2009

Honey Apple and Clementine Tart with Whipped Mascarpone


Ingredients:
2 sheet frozen puff pastry (half of 17.3-ounce package), thawed
2 small Golden Delicious apple, halved, cored, thinly sliced
3 small clementines, halved and thinly sliced
1 cup of orange juice
2 tbsp and 1 tsp orange liqueur
2 tbsp sugar
2 tablespoons unsalted butter, melted
4 teaspoons sugar
8 teaspoons honey
1 cup mascarpone cheese

Flour, for dusting


Thaw the puff pastry according to directions (approximately 40 minutes). Preheat oven to 400 degrees.

Cut each sheet of puff pastry into 9 even squares. Separate the squares and leave some room between them on a lightly floured baking sheet. Create a border around the inside of each square by scoring about 1/2-inch around the inside the square, and folding over the edges. Prick the dough inside the small square. Cover and refrigerate for at least 20 minutes.


In the meantime, place the clementine slices in a small saucepan with the orange juice, 2 tbsp liqueur, and 2 tbsp of sugar over medium heat until the liquid evaporates or the rind is soft and sweet (15 minutes). Remove the clementine slices from the pan and place to the side.

On each pastry square, fill with slices of apple and a slice of the candied clementine within the border.

Brush fruit on each tart with the melted butter and sprinkle with sugar.

Bake tarts until pastry is golden and apples are tender, about 20 minutes. Drizzle each tart with 1 teaspoon honey. While tarts are cooling, whisk the mascarpone with orange liqueur. Top each cooled tart with a dollop of flavored mascarpone.


If you're short on time or want to go for a simpler route, you can opt out of the clementines entirely and make an apple tart. Alternately, you could make it an apple and nectarine tart, which is what the recipe originally called for. No candying. I, however, got confused while at the market, and ended up with a different fruit that also had lots of consonants and vowels.

Sunday, January 4, 2009

三杯雞 (Three Cup Chicken)

This is my mom's take on San-Bei-Ji, which is a traditional Taiwanese dish. The three cups called for are sesame oil, rice wine, and soy sauce. Limited resources means this recipe is a little less traditional, but definitely just as delicious.

Ingredients:
12-14 chicken legs (Chop large ones into smaller pieces as necessary)
10 large shiitake mushrooms, stems off and halved
3 stalks green onions
6 cloves of garlic, minced
4-5 thin slices of ginger, skin off and julienned
1/8 cup vegetable oil, 1/8 cup sesame oil
1/2 a beer

3/4 cup soy sauce
2 tsp sugar


Chop off the base the green onion; julienne the white section of the green onion, and chop the green section into large pieces, about 1 inch long.


Heat both oils over medium high in a large pan. Once the oil is hot, add in the green onion whites, garlic, and ginger.


When the spices have released their flavor, add in the chicken. After letting cook for a minute, add in the soy sauce, beer, and sugar. Stir thoroughly, and reduce heat to medium low.


Stew for fifteen minutes.


Bring the heat back up to high, and wait for the liquid to reduce (approximately ten minutes). Add in the mushrooms and the green onion greens, and let sit for an additional 2 minutes. Serve with steamed white rice. (Serves 6-8.)

Friday, January 2, 2009

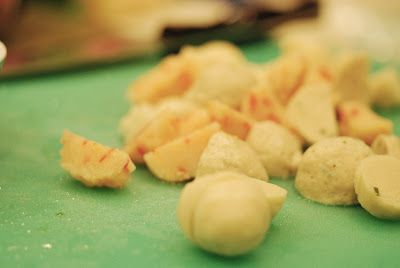
Fish Ball Soup

It's a new year.
Weighing in everything (everything) in my life, this is my most hopeful year.
Hope-filled, rather.
My only resolution and prayer: Serenity to accept the things I cannot change, courage to change the things I can, and the wisdom to know the difference. Alternately, I could also do with the strength to change what I can, the inability to accept what I can't, and the incapacity to tell the difference.*

(*I sincerely believe that Calvin and Hobbes holds the answers to most of life's mysteries if we just look hard enough.)

As of January 26th, 2009, it will be the year of the Ox. It's never been a personal favorite, since it entails quiet suffering, and I prefer to suffer loudly. But here we are: the year of prosperity through hard work, the year that rewards patience, tireless effort, and the capacity to endure any hardship without complaint. And this year, I'm hoping with all that I have that it's true. Ox, don't fail me now.

In the vein of vain Chinese superstitions, I'm ushering in the new year with a lucky food: fish. (If you don't really understand the concept of lucky food, we're in the same boat, but this should help a bit.) But because I desperately need the new year to start now and because I'm afraid of fish heads, we're going to have a recipe for fish ball soup on the second day of January instead of a recipe for whole fish when Chinese New Year's rolls around. Fish (魚) symbolizes both success and abundance. It can't hurt, right? Right.


Fish Ball Soup
(sounds off-putting, but really, when you think about it: meatballs?)

Ingredients:
5 cups water
1/2 pound fish balls, cut into quarters
1/2 pound shrimp balls, cut into quarters
1/2 tsp granulated chicken bouillon
1 large stalk celery, diced
1 egg, beaten
1 tsp salt
1/4 tsp white pepper
1 tsp soy sauce
1/2 tsp sesame oil
4 sprigs cilantro, chopped


In a medium pot, bring water to a boil. Add in cut fish and shrimp balls, and let stew for a minute to bring out the flavor. Add in the soy sauce (mostly for color), bouillon, salt, white pepper, and sesame oil, and let sit for another minute.

With the soup still at a boil, slowly pour in the egg over the surface of the soup. The boiling should break up the egg as it cooks so that it becomes the light and delicate texture of egg flower. (Do not stir the soup as the egg cooks, or you will end up with an unpleasantly opaque-ish soup, and no egg.) For heartier eggs, reduce the heat to medium before pouring the egg in, so that the egg doesn't break up as it cooks.)


Add the celery and cilantro last so that they retain their distinct individual flavors and so that the celery still retains some of its crunch. Serve immediately. (Serves 4-6).


Simplest soup ever. And still so tasty.
 

Free Blog Counter